Large, under-optimized images slow down site speed and drive people away from your store. Research shows that if an ecommerce site loads slower than expected, over 45% of visitors admit they’re less likely to make a purchase.
It’s clear image optimization is an art that you want to master. From attracting shoppers perusing Google images to reducing site load time, image optimization is an important part of building a successful ecommerce website, since product photography is a cornerstone of an online store.
Have the following questions ever left you scratching your head?
- Why is it that when I do a Google image search my product photos never show up?
- Do I need to add alt attributes to my images?
- What’s the difference between JPEG, GIF, and PNG? When should I use one over another?
This article will cover exactly that.
Shortcuts ✂️
What is image optimization?
Image optimization is about reducing the file size of your images as much as possible, without sacrificing quality, so your page load times remain low. It’s also about image SEO. That is, getting your product images and decorative images to rank on Google and other image search engines.
Image optimization means ensuring your images look flawless on desktop and mobile. And that they don’t hinder web performance.
The goal of image optimization is to create high-quality images with the lowest file size. Three main elements play a role here:
- Image file size (JPEG vs. PNG vs. WEBP images)
- Compression level
- Image height and width
By finding the balance between the three, you can reduce image size and improve website performance.
Why do we optimize images?
Images are the largest contributor to overall page size, which makes pages slow to load. Data from HTTP Archive reveals that unoptimized images make up, on average, 75% of a total webpage’s weight. This can result in a negative impact on your website performance.
Image optimization helps lower your webpage’s weight, which results in the following benefits:
Improved website speed
Image optimization for web and mobile exists to make web pages load faster. They create a better browsing experience for shoppers. Should there be a mere two-second delay in your page speed, your bounce rate can increase by 103%.
Page speed is how fast content on your page loads. It’s often described as:
- Page load time, or the time it takes to display the content on your page
- Time to first byte, the number of milliseconds it takes for your browser to receive the first byte of information from your webserver
Google has suggested that site speed is one of the signals used by its algorithm to rank pages. Research from Moz has shown that Google may specifically measure time to first byte when it considers page speed. A slow page means that search engines crawl fewer pages with their crawl budget, which can negatively affect your indexing.
Better browsing experience
Page speed is important to a visitor’s experience. People can detect delays as short as 1/10th of a second. Anything longer than that doesn’t feel “instant.” Delays of one second are enough to interrupt a person’s thought process.
The
BBC found that for every extra second of page load time, 10% of users will leave.
Pages with a longer load time tend to have higher bounce rates and lower average time on page. Reducing page load times by even one second will improve your user’s experience. Improved user experience and interactions with your site have a positive impact on search engine rankings, which can improve engagement, conversions, and customer retention.
Improved search performance
Optimized images help both readers and search engines understand your website better and get your content seen online. Recent data shows that images are returned for 32% of search queries on Google. Image optimization can help rank your images in Google’s Image Search, which can bring more traffic to your website and build your brand.
What’s more, visual search is becoming more important, as seen with Google introducing a new search function that combines images and text into one query. Some 62% of Gen Z and millennial consumers want visual search more than any other new technology.
Top 10 image optimization techniques
1. Use concise and direct image names
It’s really easy to blow through hundreds of product shots and keep the default file names your camera assigns.
When it comes to image SEO, it’s important to use relevant keywords to help your webpage rank on search engines. Creating descriptive, keyword-rich file names is crucial for image optimization. Search engines not only crawl the text on your webpage, they also crawl your image file names.
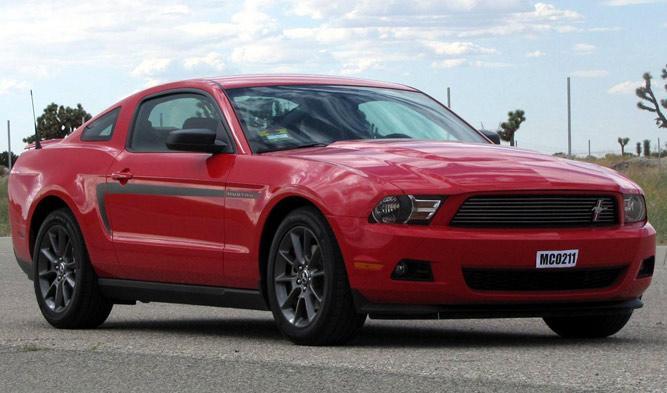
Take this image, for example.

You could use the generic name your camera assigned to the image (e.g., DCMIMAGE10.jpg). However, it would be much better to name the file 2012-Ford-Mustang-LX-Red.jpg.
Think about how your customers search for products on your website. What naming patterns do they use when they search? In the example above, car shoppers may search terms like:
- 2012 Red Ford Mustang LX
- Ford Mustang LX Red 2012
- Red Ford Mustang LX 2012
Look at your website analytics to see what keyword patterns your customers follow. Determine the most common naming patterns they use and apply that formula to your image file naming process.
If you’re not going to get that data-driven, just be sure to use relevant, helpful keywords when naming your images (i.e., try to be descriptive).
Check out this Q&A from Moz to understand the importance of strategically naming the image files on your site. It can definitely improve your on-page SEO, but it can also help your pages and images rank higher on search engine results pages (SERPs).
2. Optimize your alt attributes carefully
Alt attributes are the text alternative to images when a browser can’t properly render them. They’re also used for web accessibility. Even when the image is rendered, if you hover over it, you will see the alt attribute text (depending on your browser settings).
The alt attribute also adds SEO value to your website. Adding appropriate alt attributes that include relevant keywords to the images on your website can help you rank better in the search engines. As a matter of fact, using alt attributes is probably the best way for your ecommerce products to show up in Google image and web search.
Let’s take a look at the source code of an alt attribute.

The number one priority when it comes to image optimization is to fill out the alt attribute for each product image on your site.
Here are some simple rules for alt attributes:
- Describe your images in plain language, just like you did for your image file names.
- If you sell products that have model numbers or serial numbers, use them in your alt attributes.
- Don’t stuff your alt attributes full of keywords (e.g. alt=”ford mustang muscle car buy now cheap best price on sale”).
- Don’t use alt attributes for decorative images. Search engines may penalize you for over optimization.
Finally, always do a sanity check from time to time. View the source of your webpages and check to see if your alt attributes are filled out properly. You’ll be surprised by what you miss when you’re moving at the speed of entrepreneurship.
3. Choose your image dimensions and product angles wisely
It’s common practice to show multiple angles of your product. Going back to the Ford Mustang example, you wouldn’t want to show just one shot of the car, especially if you’re trying to sell it. It would be in your best interest to show shots of:
- The interior
- The rear (especially that air spoiler)
- The rims
- The engine (it is a Mustang after all)
The best way to capitalize on these extra photos is to fill out your alt attributes. And the way you would do that is by creating unique alt attributes for each product shot:
- 2012-Ford-Mustang-LX-Red-Leather-Interior-Trim.jpg -> using the alt attribute of: alt=”2012 Ford Mustang LX Red Leather Interior Trim”
- 2012-Ford-Mustang-LX-Red-Rear-View-Air-Spoiler.jpg -> using the alt attribute of: alt=”2012 Ford Mustang LX Red Rear View Air Spoiler”
The key here is to add descriptions to your base alt attribute so that potential searchers land on your website. If you do the extra work, Google will reward you with searchers.
A word of caution on providing larger images
Now you might want to provide larger views for your visitors, which can make for a great user experience, but be careful.
Whatever you do, don’t place the largest image on your webpage and simply shrink the dimensions via the source code. This will increase your page load time because of the larger file size associated with the image.
Instead, make it a smaller image and provide the option to view a larger image in a pop-up or on a separate webpage. Tip: Learn how to make product images zoomable in your theme using jQuery image zoom.
4. Resize your images
Consider this:
If you have images that slowly “drool” down the screen and take over 15 seconds to load? Well, you can kiss that prospective customer goodbye!
So, what can you do?
When a customer arrives on your site, it can take a while to load everything, depending on how large your files are. The larger the file sizes, the longer it takes a webpage to load. (Note: If you’re a Shopify merchant, your Shopify theme automatically compresses images, so this shouldn’t be an issue for you.)
If you can decrease the size of the image files on your webpage and increase page load speed, fewer people who visit your site will click away.
One way you can reduce image file size is by using the Save for Web command in Adobe Photoshop. When using this command, you want to adjust the image to the lowest file size possible while keeping an eye on image quality.

- Quality: Find this in the top right-hand corner (e.g., 70).
- File format: Find this in the top right-hand corner (e.g., JPEG).
- Optimization: Find this checkbox in the top right-hand corner (e.g., Optimized).
- Color: Find this checkbox in the top right-hand corner (e.g., Convert to sRBG).
- Downsizing and sharpening: Find this in the bottom right-hand corner (e.g., W: and H:).
- Expected file size: Find this in the bottom left-hand corner (e.g., 136.7K).
You can also opt to use Export As.

If you don’t have Adobe Photoshop, there are numerous online tools you can use for image editing. Adobe even has a free image editing application for smartphones and tablets, Photoshop Express. This tool doesn’t have all of the capabilities of the desktop version of Adobe Photoshop, but it covers all the basics of image editing and doesn’t cost an arm and a leg.
Here are some other impressive online image editing tools:
- PicMonkey has been described by experts as a “staggeringly great photo editing tool.”
- PIXLR is super user-friendly and comes with a 100% free app for your smartphone, so you can edit on the go.
- Canva is another fairly advanced online image editor.
Finally, there’s always GIMP. GIMP is an open-source free image-editing software application that can be run on Windows, Mac, or Linux. It can do everything Photoshop can do, but tends to be a bit clunkier. But for a free image editing application, you can’t beat it.
For ecommerce images, a good rule of thumb is to try to keep your image file size below 70 kilobytes. That can be difficult at times, especially for larger images.
5. Choose the right image format
There are three common file types that are used to post images to the web: JPEG, GIF, and PNG.
Let’s look at the three types and how they affect the same image:

JPEG (or .jpg) is the de facto standard image file type for the web. JPEG images can be compressed considerably, which results in quality images with small file sizes. In the image above, the JPEG format allows decent quality at a low file size.

GIF (.gif) images are lower quality than JPEG images and are used for more simplistic images, such as icons and decorative images. GIFs also support animation.
Regarding image optimization, GIFs are great for those plain, simple images on a webpage that include just a few colors.

PNG images are becoming more popular as an alternative to GIFs. PNGs support many more colors than GIFs, and they don’t degrade over time with re-saves, like JPEGs do. Even though the PNG file type is starting to be used more often, the file sizes can still be much larger than JPEG images.
Notice how the PNG-24 image is over three times larger in file size than the PNG-8. This is why you need to be very careful with PNGs.
Here’s an extreme example, where the image file size has been held constant at 24 kilobytes for all three file types:

As you can see, JPEG is the clear winner here. GIFs and PNGs degrade in quality in order to remain at the same low file size.
Here are some tips to remember when choosing file types:
- In most cases in ecommerce, JPEGs will be your best bet. They provide the best image quality for the smallest file size.
- Never use GIFs for large product images. The file size will be very large and there is no good way to reduce it. Use GIFs for thumbnails and decorative images only.
- PNGs can be a good alternative to both JPEGs and GIFs. If you are only able to get product photos in PNG format, try using PNG-8 over PNG-24. PNGs excel as simple decorative images because of their extremely small file size.
Most image editing software can save images to any of the file formats discussed above.
6. Optimize your thumbnails
Many ecommerce sites will use thumbnail images, especially on category pages. They quickly showcase products without taking up too much real estate.

Thumbnails are great, but be careful: they can be a silent killer. The victim? Your page load speeds. Thumbnails are usually presented at critical points during the shopping process. If they are preventing your category pages from loading quickly, you could lose a potential customer. (Note: Shopify merchants don’t have to worry about thumbnail optimization, as we take care of that for you.)
So, what can you do?
- Make your thumbnail file sizes as small as possible. It may be worth letting quality slide in favor of a lower file size here. Remember, the cumulative impact of your thumbnails will have a huge impact on your page load time.
- Vary your alt attribute text as to not duplicate text that you would use for the bigger versions of the same image. As a matter of fact, make your alt text wildly different. The last thing you want is the thumbnail being indexed instead of the larger image. A case could be made to leave out the alt text entirely.
7. Use image sitemaps
If your site uses Javascript galleries, image pop-ups or other “flashy” ways to improve the overall shopping experience, image sitemaps will help get your images noticed by Google.
Web crawlers can’t crawl images that are not called out specifically in the webpage source code. So, in order to let crawlers know about unidentified images, you must list their location in an image sitemap.
You can insert the following line in your robots.txt file, showing the path to your sitemap:
Sitemap: http://example.com/sitemap_location.xml
Or you can submit the sitemap to Google using the Search Console.
Google has many guidelines for image publishing, which may help your website rank higher on SERPs. In addition, you can use Google sitemaps to give Google more information about the images on your website, which can help Google find more of your images than it would on its own.
Using sitemaps doesn’t guarantee that your images will get indexed by Google, but it’s certainly a positive step toward image SEO. Google Webmaster Tools has many suggestions for correctly formatting your sitemap.
It is important for you to add specific tags for all of your images. You can also create a separate sitemap to list images exclusively. What’s important is to add all the necessary information, while using specific tags, to any sitemaps you have or will create. Follow these guidelines that Google suggests when creating a sitemap with image information.
8. Beware of decorative images
Websites often have an assortment of decorative images, such as background images, buttons, and borders. Anything non-product related can likely be considered a decorative image.
Although decorative images can add a lot of aesthetic appeal to a webpage, they can result in a large combined file size and slow load times. Therefore, you might want to consider taking a closer look at your decorative images so they won’t impair your website’s ability to convert visitors into customers.
You want to check the file sizes of all the decorative images on your site and use a template that minimizes file sizes.
Here are some tips for reducing the file sizes of your decorative images:
- For images that make up borders or simple patterns, make them PNG-8 or GIFs. You can create good looking images that are only a few hundred bytes in size.
- If possible, use CSS to create colored areas instead of using images. Use CSS styling as much as possible to replace any decorative images.
- Take a close look at that large wallpaper-style background image. Those can be huge files. Shrink them down as much as possible without ruining the image quality.
One trick you can use to eat away at your background image size is to cut out the middle of the background image and make it a flat color or even transparent. This can decrease the file size substantially.
9. Use caution when using content delivery networks (CDNs)
Shopify merchants don’t really have to worry about this, since we’re a hosted solution, but others should pay close attention. Content delivery networks (CDNs) are a go-to place to host images and other media files. They can increase your page load speeds and help solve bandwidth issues.
The one drawback is when it comes to backlinks. As you may know, backlinks are critical for SEO, and the more backlinks you have, the better your site does in the search engines.
By placing your images on a CDN, you are most likely removing the image from your domain and placing it on the domain of the CDN. So when someone links to your image, they are actually linking to the CDN domain.
Therefore, keep these best practices in mind:
- Just because something is “trendy” doesn’t mean you should follow it like a sheep. Determine if it is really the best move for your business first.
- If your website is doing tons of business every month, then a CDN is most likely a good idea, since it can help solve bandwidth issues.
- If your site only gets thousands of visitors a day right now, chances are your current hosting situation can handle the load.
There are ways around the image SEO issues associated with CDNs, but be sure to have a professional help you strategize your move first.
10. Test your images
The entire point of optimizing your images is to help increase your bottom line. We’ve talked about reducing file sizes and getting the search engines to index your images, but what about testing images to see what converts to more customers?
- Test the number of product images per page. Since load times are an issue for some non-hosted ecommerce sites, you may find that reducing the number of images on a page will increase click-through rates and sales. It’s also possible that providing a lot of images per page will improve the user experience and lead to more sales. The only way to find this out is to test it.
- Test what angles your customers prefer. You may see an increase in customer loyalty by providing the views your customers want to see. A great way to figure this out is to survey your customers about what they liked the most when viewing your product shots. Surveying and talking to your customers is a great habit to get into, in general. Still, verify by testing.
- Test how many product listings you should have on category pages. Ten, 20, 100 products? Test the number of products you list on category pages to see what works best for your customers.

Free Guide: DIY Product Photography
Learn how to take beautiful product photos on a budget with our free, comprehensive video guide.
Get our DIY Guide to Beautiful Product Photography delivered right to your inbox.
Almost there: please enter your email below to gain instant access.
We’ll also send you updates on new educational guides and success stories from the Shopify newsletter. We hate SPAM and promise to keep your email address safe.
Image optimization tools
Now that you know the best practices for image optimization, let’s look at some optimization plug-ins you can use for your website.
AVADA SEO: Image Optimizer

The AVADA SEO Image Optimizer is one of the top apps in the Shopify App Store. It has over 1,100 reviews and maintains a 4.9 out of 5 star rating. It works to save you time and effort when optimizing images for your store. With just one click, you can put your image optimization on autopilot with AVADA.
Cool features include:
- Automated alt tags to every image on product page, collection page, and blog posts
- High-quality image compression to boost loading speed
- One-click optimized Googe structured metadata
- Google Search Console integration for metrics tracking
- Sitemap generator so search engines can read your site easily
TinyIMG SEO & Image Optimizer

TinyIMG SEO & Image Optimizer is another great optimization tool for Shopify store owners. It automatically optimizes images and uploads them to your Shopify store. You can restore to the original image at any time and optimize images manually, too.
TinyIMG also offers:
- Image resizing
- Ability to fix technical SEO and speed issues
- Broken link redirection
- JSON LD
- Live support
- Automated image optimization
TinyPNG

TinyPNG is the most popular image optimization tool on the web. It uses smart lossy compression techniques to reduce image file size for your webpage (WEBP), JPEG, and PNG files. You can shrink images for your apps or store, plus shrink animated images.
TinyPNG’s API resizes images for thumbnails automatically, removing any unnecessary parts and adding more background. It’s available as a WordPress plug-in if you run your website on WordPress.
Keeping beautiful photos functional
Now questions about your ecommerce images won’t leave you tossing and turning for hours.
You know some image SEO strategies to get your product photos into Google image search results. You know how to fully leverage alt attributes. You know the difference between file types and when to choose each option.
Still, image optimization is complex and we’ve just scratched the surface, so feel free to leave any questions you might have in the comments below.
Ready to create your business? Start your free 14-day trial of Shopify—no credit card required.
Image optimization FAQ
What does image optimization mean?
What are the benefits of optimizing images?
- Improve website speed
- Create better browsing experiences
- Improve search performance
What are image optimization techniques?
- Use concise and direct image names
- Optimize your alt attributes
- Choose image dimensions and product angles wisely
- Resize images
- Choose the right image format
- Optimize thumbnails
- Use image sitemaps